(1).png "PowerHome.com")
RV solar power is a practical solution for camping, road trips, off-grid travel, and emergency backup power. With the right setup, solar panels can collect sunlight during the day, store energy in a battery or solar generator, and provide usable power for lights, phones, laptops, fans, small refrigerators, and other RV appliances.
A basic RV solar system usually includes solar panels, solar connectors, a solar charge controller, a battery or solar generator, and an inverter. Each part has a clear function: the solar panel generates DC power, the controller manages charging, the battery stores energy, and the inverter converts DC power into AC power for household-style devices.
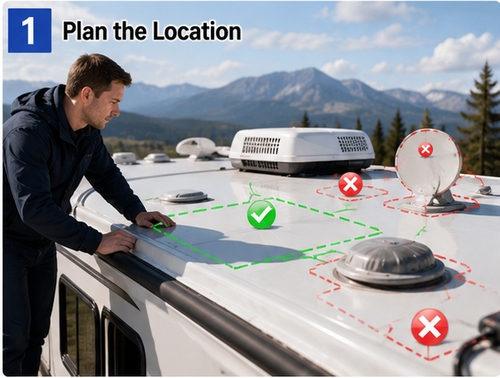
Step 1. Plan the Solar Panel Location on the RV Roof
Before installing solar panels, choose a suitable location on the RV roof. The best position should receive direct sunlight for most of the day and should avoid shade from air conditioners, roof vents, skylights, antennas, roof racks, or other rooftop equipment.
Even a small shadow can reduce the output of a solar panel, especially when panels are connected in series. Leave enough space between panels and rooftop equipment for airflow, wiring, and future maintenance. It is also important to consider the direction of cable routing so the wires can enter the RV cleanly and safely.
Before installation, clean the roof surface thoroughly. Remove dust, dirt, oil, moisture, and loose materials. A clean surface helps brackets, mounting feet, screws, and sealant bond more securely to the roof.
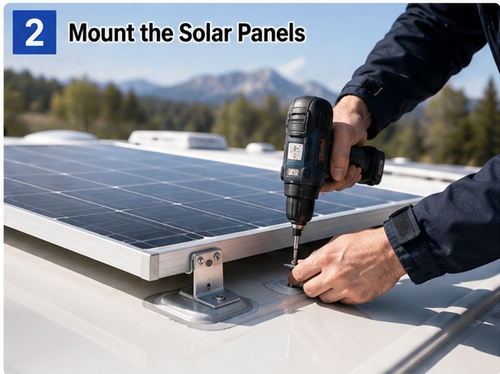
Step 2. Mount the Solar Panels Securely
Solar panels are commonly installed with Z brackets, corner brackets, adjustable mounting brackets, or RV-specific mounting feet. First, attach the mounting brackets to the solar panel frame. Then place the solar panel on the selected roof area and confirm the final position before drilling or bonding.
If the installation requires screws, mark the hole positions carefully and drill only where needed. Apply waterproof sealant around the holes and under the mounting brackets to prevent water leakage. After fastening the screws, apply another layer of sealant around the screw heads and bracket base.
For some RV roofs, adhesive mounting may also be used, but the adhesive must be suitable for outdoor use, vibration, heat, and long-term exposure. In many cases, a combination of mechanical fastening and waterproof sealant provides better security.
After mounting, gently check the solar panel for movement. The panel must remain stable because RVs face vibration, wind pressure, rain, and road movement during travel.
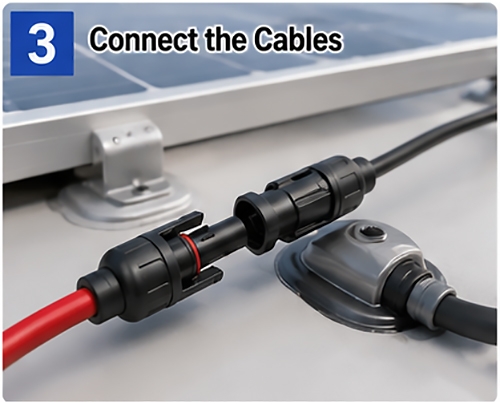
Step 3. Connect the Solar Panel Cables
Solar panels output DC electricity. Most RV solar panels use PV cables and MC4-style solar connectors for positive and negative connections. Always identify the positive and negative wires before connecting them.
For a single solar panel, the wiring can usually run directly from the panel to the solar charge controller or solar generator input. For multiple panels, the panels may be connected in series or parallel depending on the system design.
A parallel connection increases current while keeping voltage lower. This is common in many RV systems. A series connection increases voltage and can work well with some MPPT solar charge controllers, especially when cable distance is longer or sunlight conditions vary. If several panels are used, solar Y branch connectors or a PV combiner box can help organize the wiring and make the system cleaner.
When routing wires from the roof into the RV, use a waterproof cable entry gland or roof cable entry box. The entry point should be sealed carefully to prevent rainwater from entering the vehicle. Keep cable runs as short and neat as possible to reduce power loss and improve safety.
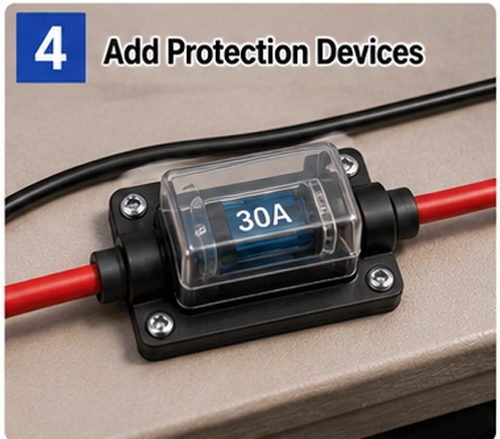
Step 4. Add Protection Devices
Solar wiring should include proper protection devices such as fuses, circuit breakers, or disconnect switches. These components help protect the system from overcurrent, short circuits, and wiring faults.
A fuse or breaker is usually installed between the solar panels and the charge controller, and another protection device may be installed between the controller and the battery. The correct fuse size depends on the solar panel current, wire size, and system voltage.
Before final connection, use a multimeter to check the solar panel voltage and confirm polarity. Reversed polarity can damage the charge controller, battery, or solar generator input.
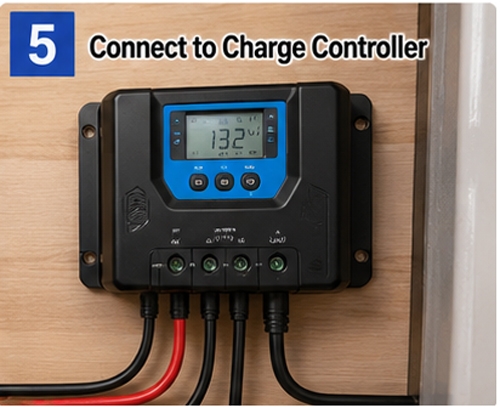
Step 5. Connect to a Solar Charge Controller
Solar panels should not normally be connected directly to an RV battery without a charge controller. A solar charge controller manages the charging process and helps protect the battery from overcharging, excessive current, reverse polarity, and voltage problems.
There are two common types of controllers: PWM and MPPT. PWM controllers are simple and cost-effective for smaller systems. MPPT controllers are more efficient and are often preferred for RV solar systems, especially when using multiple panels or when sunlight conditions change throughout the day.
The usual connection order is:
- Connect the battery to the charge controller first.
- Allow the controller to detect the battery voltage.
- Connect the solar panel input to the controller.
- Connect the load or inverter side according to the system design.
This order helps the controller recognize the system properly and reduces the risk of connection errors.
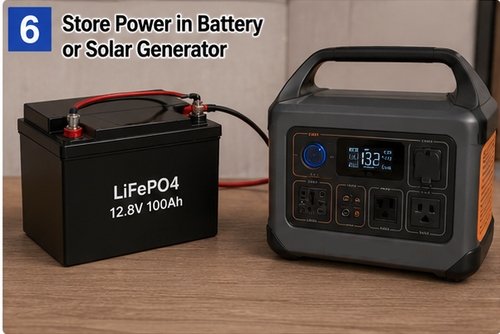
Step 6. Store Solar Power in a Battery or Solar Generator
After the solar charge controller receives power from the solar panels, it sends regulated charging power to the storage device. In an RV system, power is usually stored in a deep-cycle battery, lithium battery, LiFePO4 battery, lead-acid battery, or portable solar generator.
A traditional RV battery system usually needs separate components: solar panels, charge controller, battery, inverter, fuses, and wiring. This setup is flexible and suitable for users who want a customized system.
A solar generator is simpler. It usually combines a battery, charge controller, inverter, display, and output ports in one portable unit. In this setup, the solar panel connects directly to the solar input port of the solar generator. The power is stored inside the unit and can be used through AC outlets, DC ports, USB ports, or car charger outputs.
For RV users who want easy installation, portable use, and less wiring, a solar generator is often a convenient option.
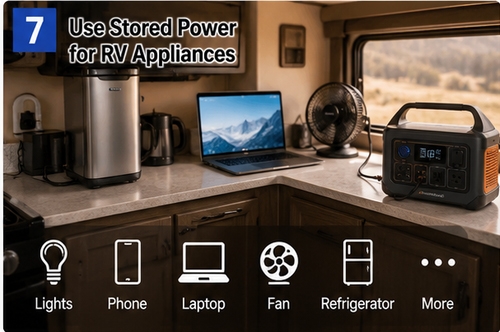
Step 7. Use Stored Power for RV Appliances
Once energy is stored, it can be used in different ways depending on the device.
Small electronics such as phones, tablets, cameras, GPS devices, and lights can usually be powered by USB or DC outputs. RV fans, LED lights, water pumps, and portable refrigerators may use 12V DC power. Devices such as laptops, small kitchen appliances, projectors, and other household-style equipment usually require AC power.
For AC appliances, the system needs an inverter. The inverter converts DC power from the battery into AC power. In a traditional RV solar system, the inverter is a separate device. In a solar generator, the inverter is already built in, so users can plug AC devices directly into the unit.
The complete energy flow is simple:
Solar panel → Solar charge controller → Battery or solar generator → DC output or AC inverter output → RV appliances
During the day, the solar panels can charge the battery while also supporting some loads. At night or in cloudy weather, the RV uses the stored energy from the battery or solar generator.
Step 8. Test the System After Installation
After installation, test the system step by step. First, check whether the solar panels produce normal voltage under sunlight. Then confirm that the charge controller shows a charging status. Next, check whether the battery or solar generator is receiving power. Finally, test the output ports or inverter by connecting a small device.
If the system does not charge, check the following points:
- Whether the solar panel is shaded
- Whether the positive and negative wires are reversed
- Whether the connectors are loose
- Whether the fuse or breaker is open
- Whether the controller settings match the battery type
- Whether the solar generator input voltage range matches the solar panel output
Testing helps identify problems early and keeps the RV solar system safe and reliable.
Step 9. Maintain the RV Solar System
RV solar systems are exposed to sunlight, rain, dust, road vibration, and temperature changes. Regular maintenance helps extend service life and maintain stable performance.
Clean the solar panel surface regularly to remove dust, leaves, bird droppings, and dirt. Check mounting brackets to make sure they are not loose. Inspect cable entry points and sealant for cracks or leaks. Check connectors for corrosion or water damage. Also inspect cables for wear, cuts, or heat damage.
Before long road trips, it is useful to check whether the solar panel, controller, battery, and inverter are working properly. A quick inspection can prevent power problems during camping or remote travel.
(1).png)


